Multiple updates since last revision
Last updated Jun 6, 2025
Introduction to Agents
This guide provides an in-depth understanding on incredible agents and the different features available on the platform.
What is an agent and why do we need them?
We're drowning in productivity tools, yet somehow we're less productive than ever. Between managing emails, updating spreadsheets, coordinating across platforms, and keeping track of endless tasks, the modern knowledge worker spends more time managing their tools than actually doing meaningful work.
Traditional automation promised to solve this—and to some extent, it did. We could set up rules and triggers to handle repetitive tasks. But these solutions were rigid, requiring extensive setup for each specific scenario. They worked well for simple, predictable workflows but fell apart when faced with the complexity and nuance of real work.
While traditional automation operates on rigid if-this-then-that logic, agents understand intent and context. They can interpret what you want to achieve and figure out the best way to get there, even when the path isn't explicitly mapped out.
Consider this comparison:
Traditional Automation: "If email received from boss, mark as important and forward to team."
Agent-Based Automation: "Help me stay on top of urgent communications and make sure nothing important slips through the cracks."
At its core, an agent is a digital assistant that can think, decide, and act on your behalf—based on your goals.
Incredible agents
Agents on Incredible operate on three different segments. You can create an agent to either start a new task to automate routine tasks across applications, start a new analysis to analyze data and generate insights or simply gather information and explore topics through starting a research.
You can select either one of these options on the “Explore Agents” page to start with an agent.

Understanding the interface and features
It’s crucial to understand the different features and buttons available when configuring and using agents in incredible.one. Apart from the prompt box, there are a couple of micro-features that enable you to do different things on the platform.
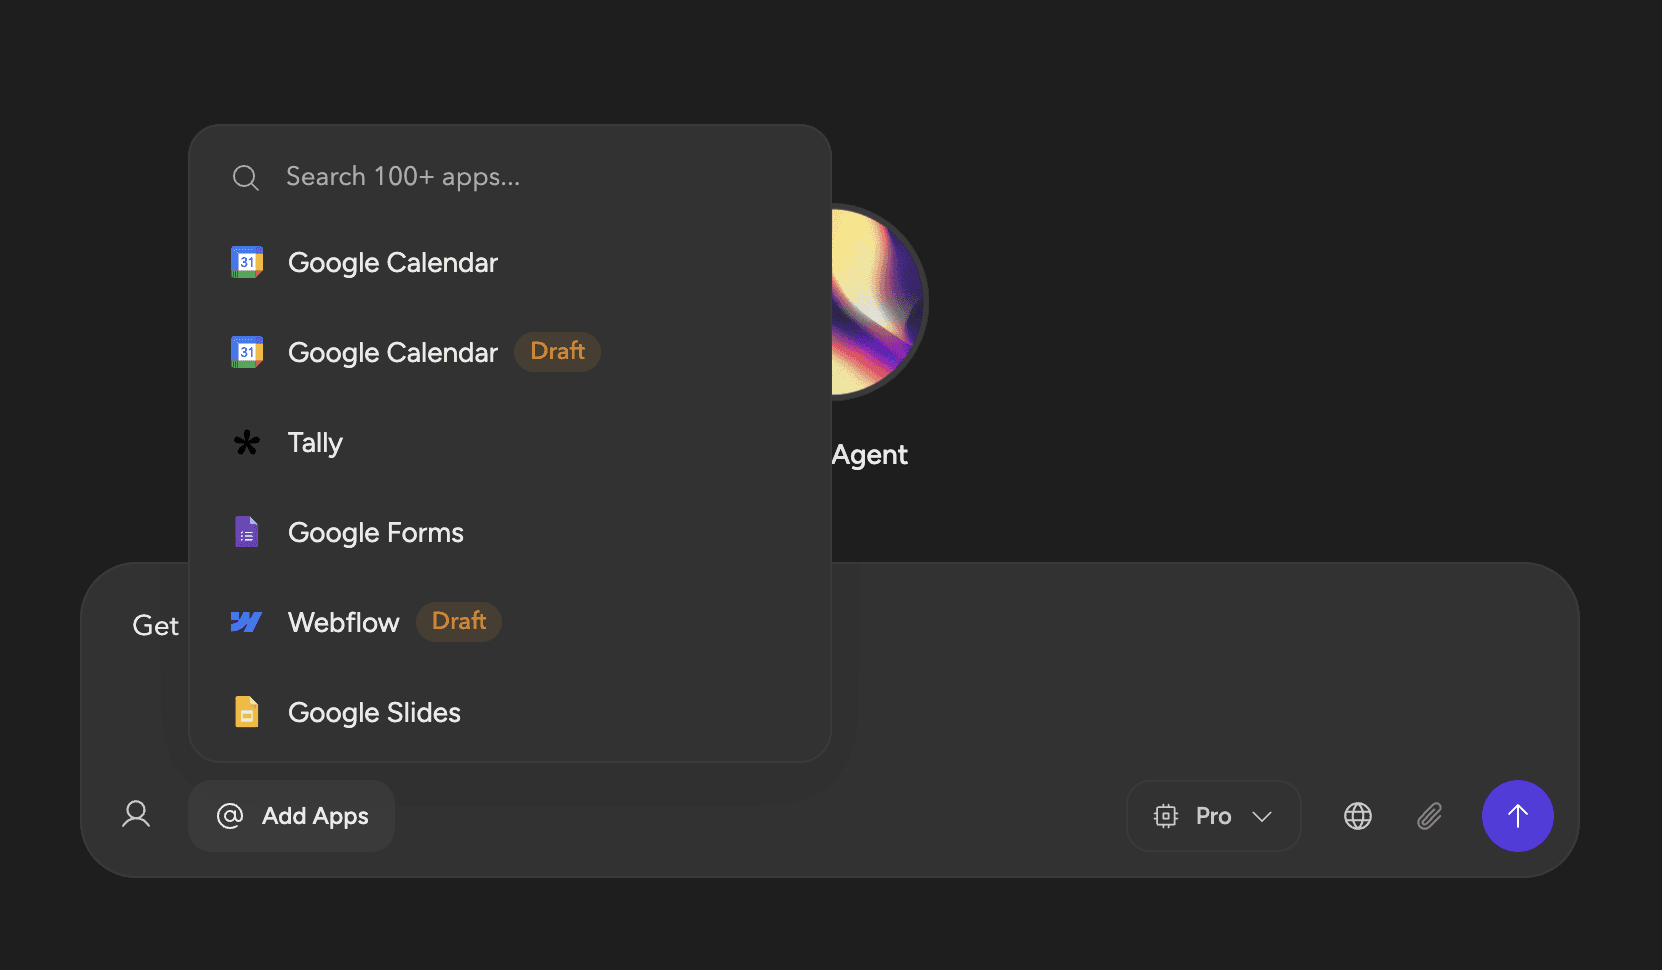
Connecting your apps
You can browse through all available apps and it’s features by clicking the “Browse Apps” option on your sidebar.
However, to connect apps when using an agent, you need to click on the “@ Add Apps” option on the prompt box. You can search and add in your apps by clicking on them.
You can handle app account credentials by clicking on the “accounts” icon next to the “@ Add Apps” option.
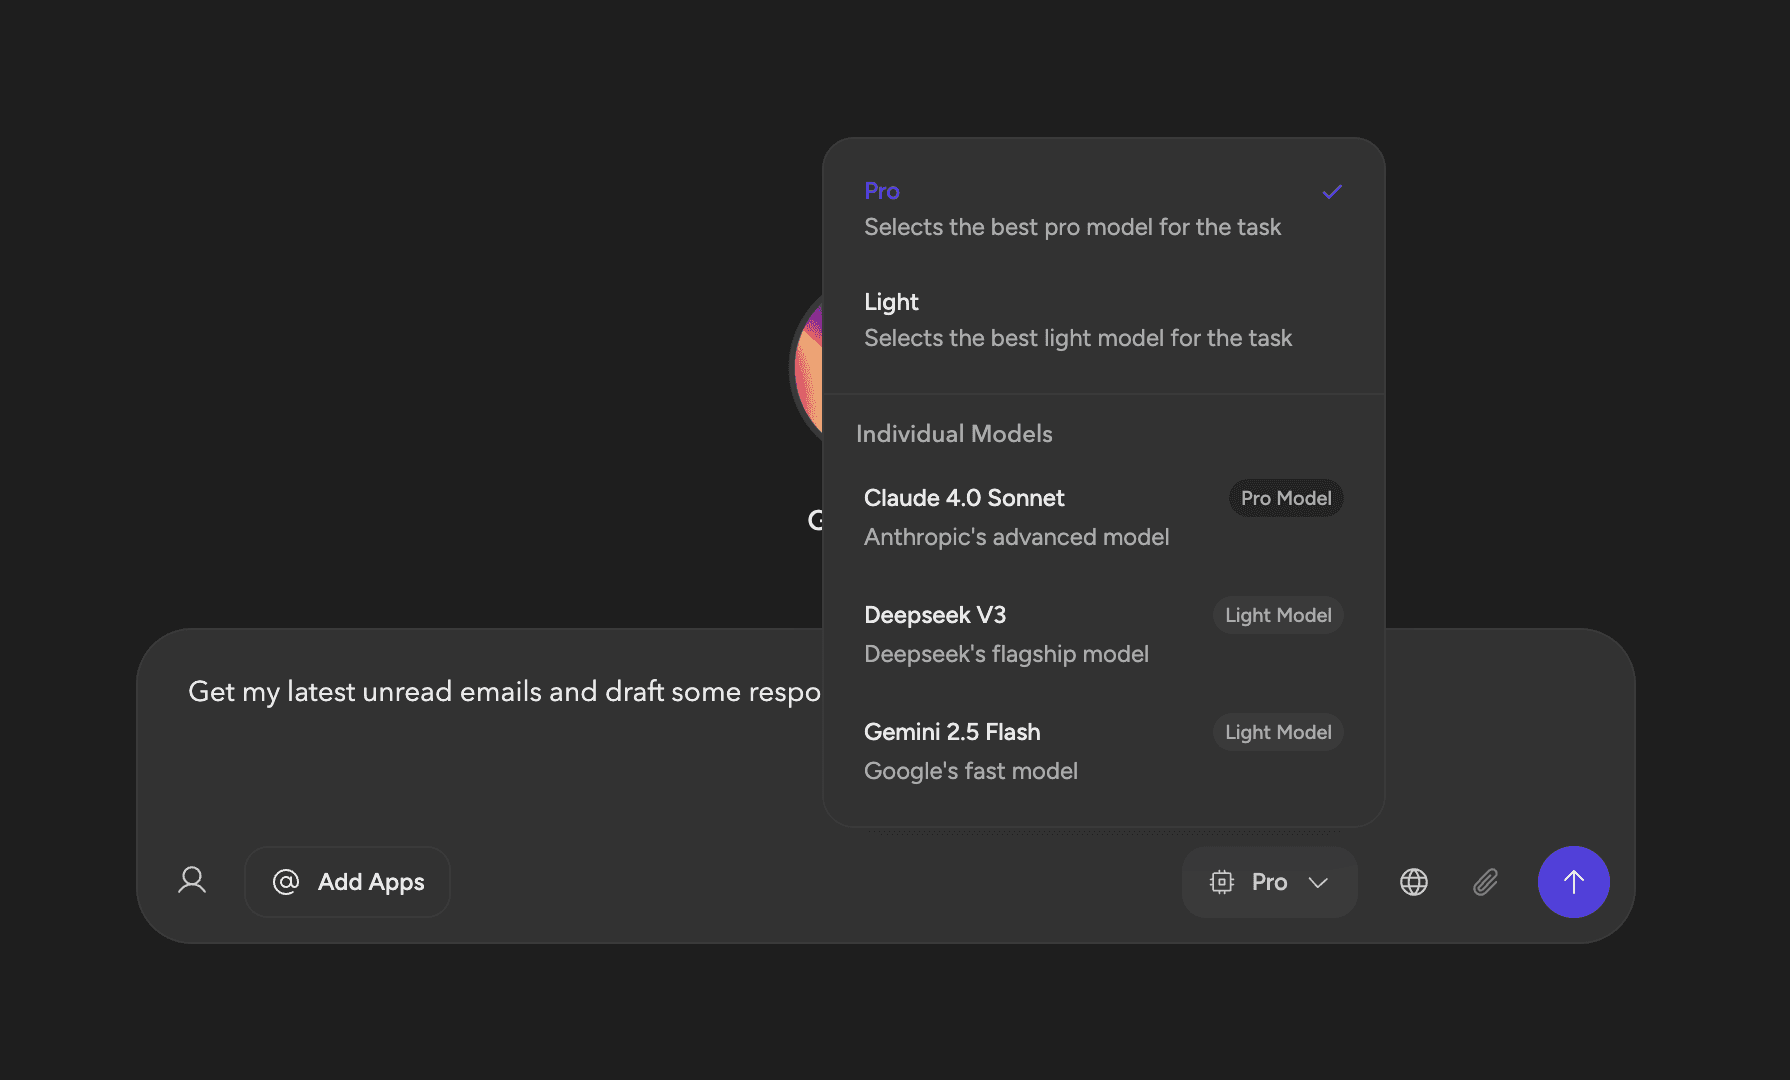
Pro vs Light Models
We offer you the freedom to select between different LLM models by clicking on the “Model” icon.
The difference in performance between the models can vary and we often recommend using lighter models to save your pro requests for lighter and smaller tasks that require less AI power. (Try out Gemini 2.5 Flash - An extremely fast model with somewhat good results)
However, for the best possible results or complex tasks, it’s often best to stick to Pro models.
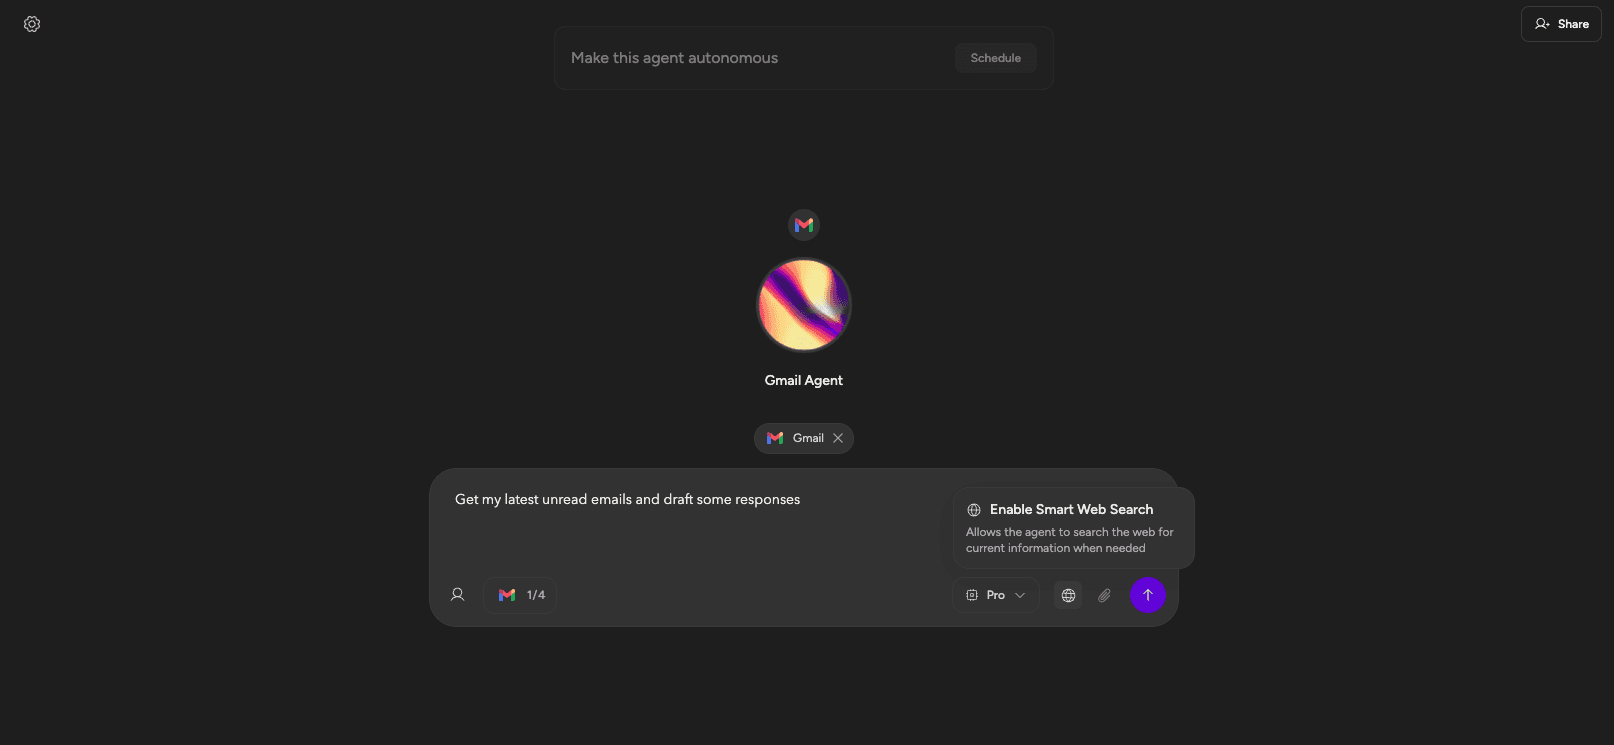
Smart Web Search
You can also click on the globe icon to enable Smart Web Search to give your agent the ability to refer the internet as a data source. This feature is enabled by default when you start a “Research” task.
Some cosmetic improvements
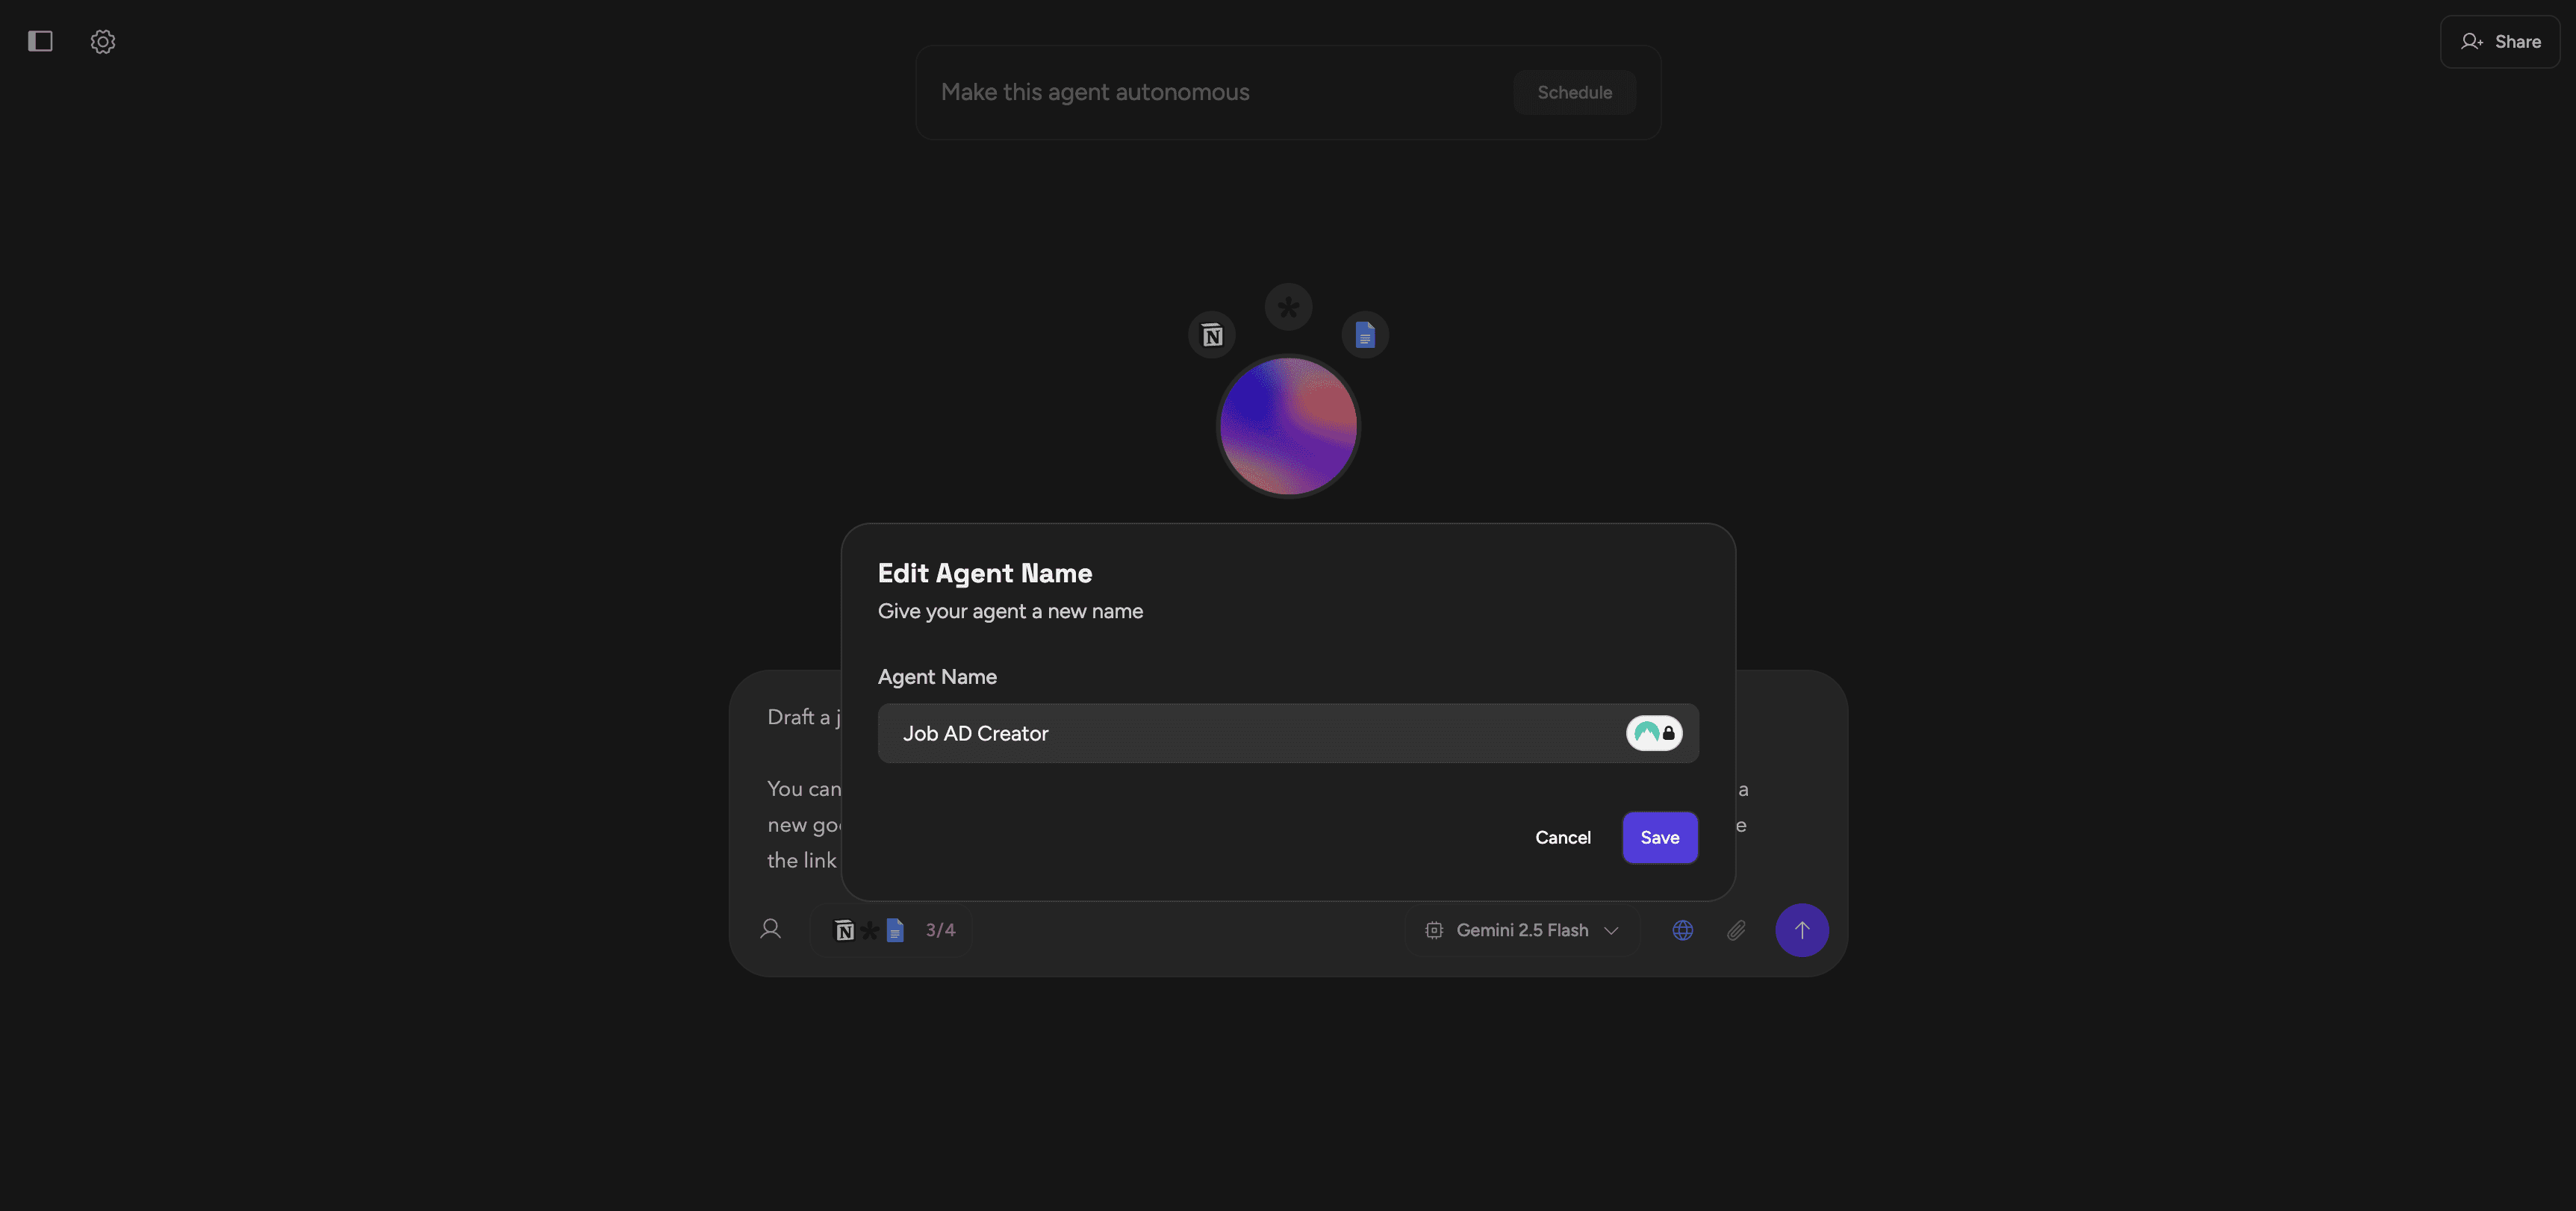
You can always change how the agent looks or change the auto-generated agent names.
Give your Agent a meaningful name
A good Agent name tells you exactly what it does at a glance:
"Email Assistant" for handling correspondence
"Data Analyzer" for spreadsheet work
"Team Updater" for Slack communications
"Project Manager" for multi-app tasks
To change your Agent's name, You can click on the agent’s name and change the name in the dialog box that appears.
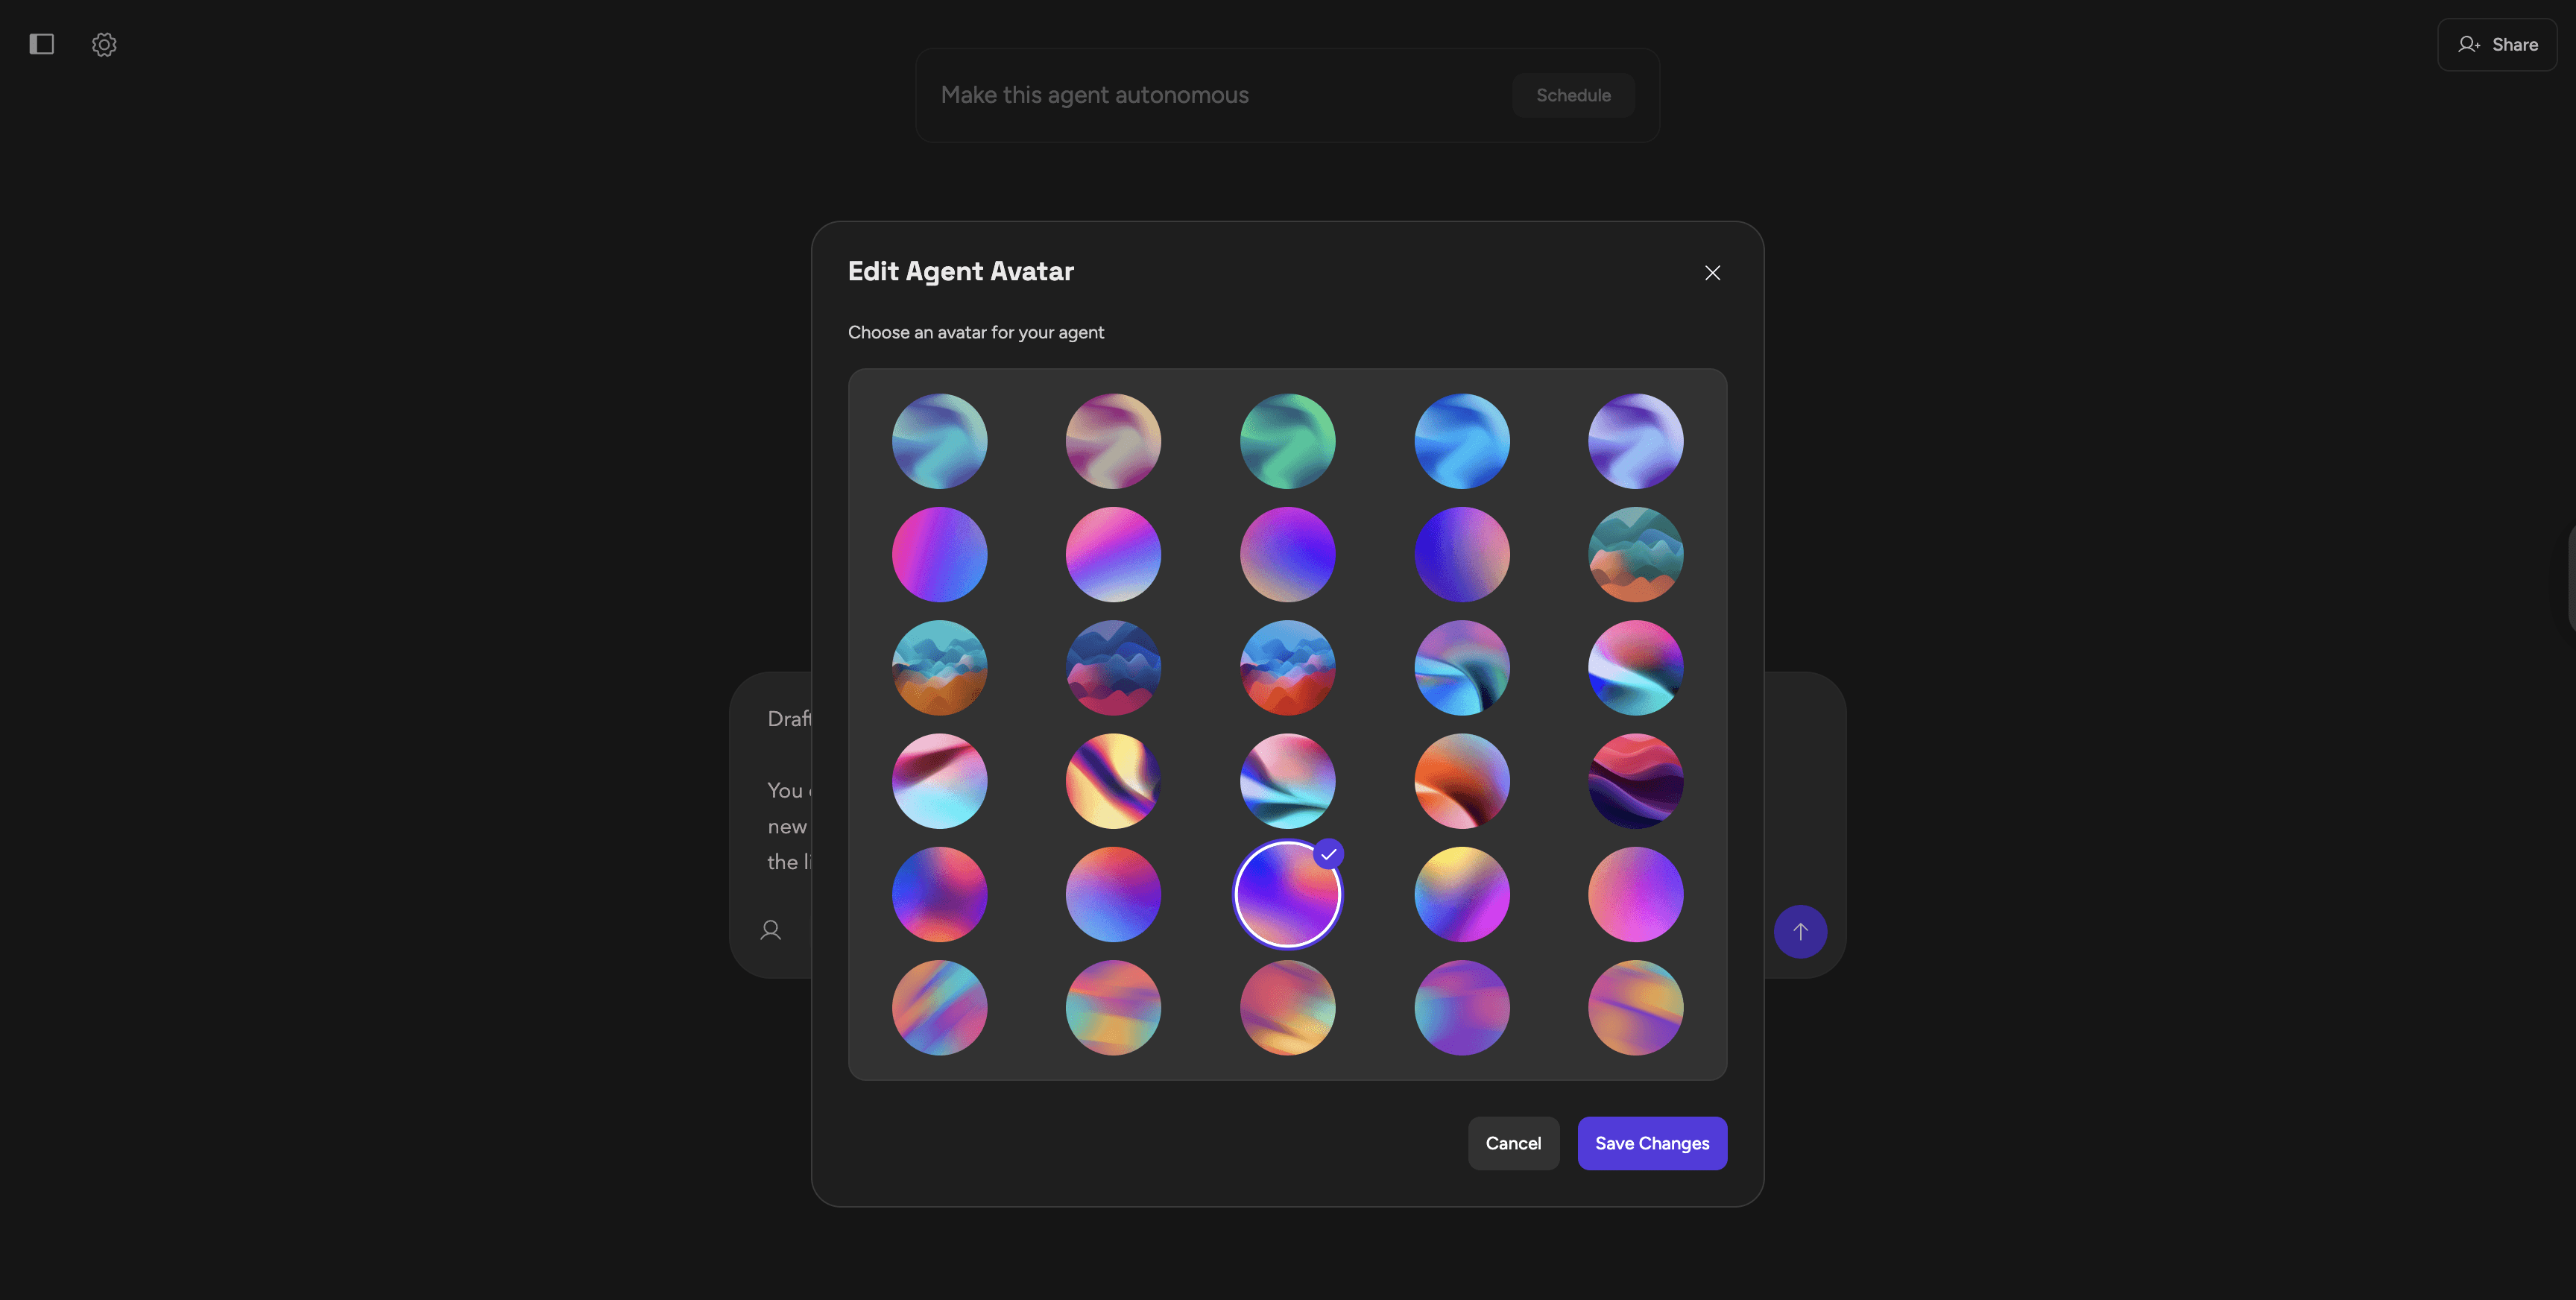
Customize agent avatar
You can customize your Agent's avatar to make it visually distinct. This becomes especially helpful when you have several Agents. Example:
Blue styles for productivity Agents
Green styles for data and analysis work
Orange styles for communication tasks
These visual cues help you select the right Agent quickly, especially when you're working fast and have multiple options.
You can change the Agent’s avatar by clicking on the current avatar and by selecting a new one from the dialog box that appears. Click on “Save Changes” to apply the new icon.
Organizing your Agents
You can right click on any of your agents and organize them according to particular labels to help find them easily or even select the option to “Add Agent to My Agents” to make the agents accessible through your sidebar.
Deleting your Agent
Deleting an agent is simple as right clicking on the agent and then clicking on “Delete”

Frequently asked questions
Hey my agent is missing and I can’t seem to find it! All agents are saved under the “Recent” tab on the “Explore Agents” page.
Need any more Help?
If you have any questions or run into issues during the process:
Visit the Learning Center for guides and documentation
Join the Discord Community
Contact support via the button in the bottom right corner
" height="15.815610644954042px" id="uJo3xAYka" transform="translate(0 0.214)" width="11.202782970478061px"/><path d="M 0 15.794 L 0 0.566 L 2.522 0.566 L 2.522 15.794 L 0 15.794 Z M 4.593 15.794 L 4.593 4.917 L 6.876 4.917 L 7.028 6.918 L 7.028 15.794 Z M 11.965 15.794 L 11.965 10.225 L 14.4 10.225 L 14.4 15.794 Z M 11.965 10.225 C 11.965 9.355 11.863 8.687 11.66 8.223 C 11.472 7.745 11.196 7.411 10.834 7.223 C 10.486 7.034 10.073 6.94 9.594 6.94 C 8.783 6.925 8.152 7.194 7.703 7.745 C 7.253 8.296 7.028 9.086 7.028 10.116 L 6.115 10.116 C 6.115 8.97 6.282 7.991 6.615 7.179 C 6.949 6.352 7.427 5.729 8.051 5.308 C 8.674 4.873 9.413 4.656 10.268 4.656 C 11.138 4.656 11.878 4.83 12.486 5.178 C 13.11 5.526 13.581 6.07 13.9 6.809 C 14.233 7.534 14.4 8.484 14.4 9.659 L 14.4 10.225 Z M 21.086 16.055 C 19.969 16.055 18.983 15.816 18.128 15.337 C 17.273 14.844 16.599 14.17 16.106 13.314 C 15.628 12.458 15.388 11.472 15.388 10.355 C 15.388 9.239 15.628 8.252 16.106 7.397 C 16.599 6.541 17.266 5.874 18.106 5.395 C 18.962 4.902 19.94 4.656 21.042 4.656 C 22.115 4.656 23.086 4.917 23.956 5.439 C 24.826 5.946 25.471 6.679 25.891 7.636 L 23.63 8.506 C 23.398 8.028 23.043 7.643 22.564 7.353 C 22.086 7.063 21.542 6.918 20.933 6.918 C 20.339 6.918 19.81 7.07 19.346 7.375 C 18.882 7.665 18.52 8.071 18.259 8.593 C 17.998 9.101 17.867 9.688 17.867 10.355 C 17.867 11.022 17.998 11.617 18.259 12.139 C 18.534 12.647 18.904 13.053 19.368 13.357 C 19.846 13.648 20.382 13.793 20.977 13.793 C 21.586 13.793 22.129 13.64 22.608 13.336 C 23.086 13.017 23.441 12.589 23.673 12.052 L 25.935 12.922 C 25.514 13.909 24.869 14.677 23.999 15.228 C 23.144 15.779 22.173 16.055 21.086 16.055 Z M 28.564 10.007 C 28.564 8.832 28.789 7.868 29.239 7.114 C 29.688 6.36 30.268 5.801 30.978 5.439 C 31.703 5.062 32.457 4.873 33.24 4.873 L 33.24 7.201 C 32.573 7.201 31.942 7.295 31.348 7.484 C 30.768 7.658 30.297 7.948 29.934 8.354 C 29.572 8.76 29.391 9.297 29.391 9.964 Z M 26.955 15.794 L 26.955 4.917 L 29.391 4.917 L 29.391 15.794 L 26.955 15.794 Z M 38.834 16.055 C 37.776 16.055 36.834 15.816 36.007 15.337 C 35.196 14.844 34.55 14.17 34.072 13.314 C 33.608 12.458 33.376 11.472 33.376 10.355 C 33.376 9.239 33.615 8.252 34.094 7.397 C 34.572 6.541 35.225 5.874 36.051 5.395 C 36.892 4.902 37.848 4.656 38.921 4.656 C 39.892 4.656 40.769 4.909 41.552 5.417 C 42.335 5.91 42.951 6.628 43.401 7.571 C 43.865 8.513 44.096 9.637 44.096 10.943 L 35.551 10.943 L 35.877 10.638 C 35.877 11.305 36.022 11.885 36.312 12.378 C 36.602 12.857 36.986 13.227 37.464 13.488 C 37.943 13.749 38.472 13.88 39.052 13.88 C 39.718 13.88 40.269 13.735 40.704 13.444 C 41.139 13.14 41.48 12.748 41.726 12.27 L 43.879 13.183 C 43.575 13.764 43.183 14.271 42.705 14.706 C 42.241 15.141 41.683 15.475 41.03 15.707 C 40.393 15.939 39.66 16.055 38.834 16.055 Z M 36.029 9.376 L 35.681 9.072 L 41.813 9.072 L 41.487 9.376 C 41.487 8.782 41.357 8.296 41.096 7.919 C 40.835 7.527 40.501 7.237 40.095 7.049 C 39.704 6.846 39.291 6.744 38.856 6.744 C 38.421 6.744 37.986 6.846 37.551 7.049 C 37.116 7.237 36.754 7.527 36.464 7.919 C 36.174 8.296 36.029 8.782 36.029 9.376 Z M 53.377 15.794 L 53.268 13.771 L 53.268 0.566 L 55.682 0.566 L 55.682 15.794 L 53.377 15.794 Z M 49.832 16.055 C 48.847 16.055 47.984 15.823 47.245 15.359 C 46.52 14.88 45.947 14.213 45.527 13.357 C 45.121 12.502 44.918 11.501 44.918 10.355 C 44.918 9.195 45.121 8.194 45.527 7.353 C 45.947 6.497 46.52 5.838 47.245 5.373 C 47.984 4.895 48.847 4.656 49.832 4.656 C 50.746 4.656 51.528 4.895 52.181 5.373 C 52.848 5.838 53.355 6.497 53.703 7.353 C 54.051 8.194 54.225 9.195 54.225 10.355 C 54.225 11.501 54.051 12.502 53.703 13.357 C 53.355 14.213 52.848 14.88 52.181 15.359 C 51.528 15.823 50.746 16.055 49.832 16.055 Z M 50.441 13.836 C 50.992 13.836 51.478 13.691 51.898 13.401 C 52.333 13.096 52.666 12.683 52.898 12.161 C 53.145 11.639 53.268 11.037 53.268 10.355 C 53.268 9.674 53.145 9.072 52.898 8.55 C 52.666 8.028 52.333 7.621 51.898 7.331 C 51.478 7.041 50.985 6.896 50.419 6.896 C 49.84 6.896 49.325 7.041 48.876 7.331 C 48.426 7.621 48.071 8.028 47.81 8.55 C 47.564 9.072 47.433 9.674 47.419 10.355 C 47.433 11.037 47.564 11.639 47.81 12.161 C 48.071 12.683 48.426 13.096 48.876 13.401 C 49.339 13.691 49.861 13.836 50.441 13.836 Z M 57.83 15.794 L 57.83 4.917 L 60.244 4.917 L 60.244 15.794 Z M 59.048 2.85 C 58.657 2.85 58.316 2.712 58.026 2.437 C 57.751 2.146 57.613 1.806 57.613 1.414 C 57.613 1.022 57.751 0.689 58.026 0.413 C 58.316 0.138 58.657 0 59.048 0 C 59.44 0 59.773 0.138 60.048 0.413 C 60.338 0.689 60.483 1.022 60.483 1.414 C 60.483 1.806 60.338 2.146 60.048 2.437 C 59.773 2.712 59.44 2.85 59.048 2.85 Z M 62.245 15.794 L 62.245 0.566 L 64.68 0.566 L 64.68 13.771 L 64.55 15.794 Z M 68.116 16.055 C 67.202 16.055 66.412 15.823 65.746 15.359 C 65.093 14.88 64.593 14.213 64.245 13.357 C 63.897 12.502 63.723 11.501 63.723 10.355 C 63.723 9.195 63.897 8.194 64.245 7.353 C 64.593 6.497 65.093 5.838 65.746 5.373 C 66.412 4.895 67.202 4.656 68.116 4.656 C 69.102 4.656 69.957 4.895 70.682 5.373 C 71.421 5.838 71.994 6.497 72.399 7.353 C 72.82 8.194 73.03 9.195 73.03 10.355 C 73.03 11.501 72.82 12.502 72.399 13.357 C 71.994 14.213 71.421 14.88 70.682 15.359 C 69.957 15.823 69.102 16.055 68.116 16.055 Z M 67.507 13.836 C 68.087 13.836 68.601 13.691 69.051 13.401 C 69.5 13.096 69.855 12.683 70.116 12.161 C 70.392 11.639 70.529 11.037 70.529 10.355 C 70.529 9.674 70.399 9.072 70.138 8.55 C 69.892 8.028 69.544 7.621 69.094 7.331 C 68.645 7.041 68.123 6.896 67.529 6.896 C 66.978 6.896 66.485 7.041 66.05 7.331 C 65.615 7.621 65.274 8.028 65.028 8.55 C 64.796 9.072 64.68 9.674 64.68 10.355 C 64.68 11.037 64.796 11.639 65.028 12.161 C 65.274 12.683 65.608 13.096 66.028 13.401 C 66.463 13.691 66.956 13.836 67.507 13.836 Z M 74.352 15.794 L 74.352 0.566 L 76.788 0.566 L 76.788 15.794 L 74.352 15.794 Z M 83.362 16.055 C 82.303 16.055 81.361 15.816 80.535 15.337 C 79.723 14.844 79.078 14.17 78.6 13.314 C 78.136 12.458 77.904 11.472 77.904 10.355 C 77.904 9.239 78.143 8.252 78.621 7.397 C 79.1 6.541 79.752 5.874 80.578 5.395 C 81.419 4.902 82.376 4.656 83.449 4.656 C 84.42 4.656 85.297 4.909 86.08 5.417 C 86.863 5.91 87.479 6.628 87.928 7.571 C 88.392 8.513 88.624 9.637 88.624 10.943 L 80.078 10.943 L 80.404 10.638 C 80.404 11.305 80.549 11.885 80.839 12.378 C 81.129 12.857 81.513 13.227 81.992 13.488 C 82.47 13.749 82.999 13.88 83.579 13.88 C 84.246 13.88 84.797 13.735 85.232 13.444 C 85.667 13.14 86.007 12.748 86.254 12.27 L 88.406 13.183 C 88.102 13.764 87.711 14.271 87.232 14.706 C 86.768 15.141 86.21 15.475 85.558 15.707 C 84.92 15.939 84.188 16.055 83.362 16.055 Z M 80.557 9.376 L 80.209 9.072 L 86.341 9.072 L 86.014 9.376 C 86.014 8.782 85.884 8.296 85.623 7.919 C 85.362 7.527 85.029 7.237 84.623 7.049 C 84.231 6.846 83.818 6.744 83.383 6.744 C 82.948 6.744 82.514 6.846 82.079 7.049 C 81.644 7.237 81.281 7.527 80.991 7.919 C 80.701 8.296 80.557 8.782 80.557 9.376 Z" fill="rgb(255, 255, 255)" height="16.05504533156946px" id="sXc9f6vSn" transform="translate(16.376 0)" width="88.62384698062084px"/></g></svg>)